Five Star Painting shares a simple DIY guide for creating a personalized growth chart for your home.
|
Let me state the obvious. Children grow quickly. One moment you are holding a tiny baby with wrinkly little toes, and the next moment you are holding full conversations with your teenager. Where does the time go?
As parents we cannot slow time, but we can remind ourselves to cherish each moment and each stage in our child’s life. One way to accomplish that is to create a growth chart to track your child’s height progression. This visual reminder of how small your baby was at one time is something you as a parent will enjoy, long after your child has grown up and moved out. Using the simple instructions below, you will create a growth chart that is super cute and easy to take with you if you move (as opposed to marking height on door trim!)
Supplies you will need:
- Piece of wood – 1 inch thick x 4 inches wide x 6 feet tall
- Craft Paint
- Measuring Tape + Pencil
- Wooden Numbers
- Small Nails + Hammer
- String or Wire
- Permanent Markers
Step One
Using a light paint color, such as white, paint the piece of wood. Wait for the paint to completely dry before moving to the next step.
Step Two 
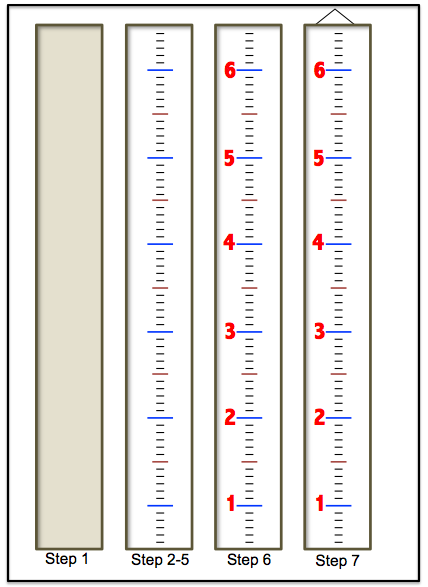
Using the tape measurer and pencil, make small tick marks on the wood indicating each inch of the length. Make slightly larger tick marks for each foot.
TIP: Take into consideration since most houses have baseboards, you will not want to start your measurements at 0 inches. Consider the bottom of the board 6 inches, then 6 inches up from there will be 1 foot.
Step Three
Using a distinct paint color, carefully draw lines indicating each foot on the board. Since the bottom of the wood indicates 6 inches, the top of the wood will indicate 6 feet and 6 inches. Upon completion of this step, you will have a line painted on the wood for 1-6 feet.
Step Four
Using a different paint color, make a slightly smaller line indicating each half-foot mark on the wood. You will have 5 lines painted on the wood for this step, because the first will be at 1 foot 6 inches and the last will be at 5 foot 6 inches.
Step Five
Using a third paint color, make small lines on each of the remaining inch lines.
Step Six
Paint the wooden numbers, and once dry, use small nails or wood glue to adhere the numbers to the wood board next-to or on top of the lines you drew during step three.
Step Seven
Two options – Less permanent: Using two small nails and the string/wire, create a loop for hanging the board on the wall. More permanent: Using large screws, drill the screws directly through the top corners of the wood and into the wall.
TIP: Keep in mind, the top of the board indicates 6 feet 6 inches, therefore you will need to measure before hanging to ensure accurate height.
That’s it!
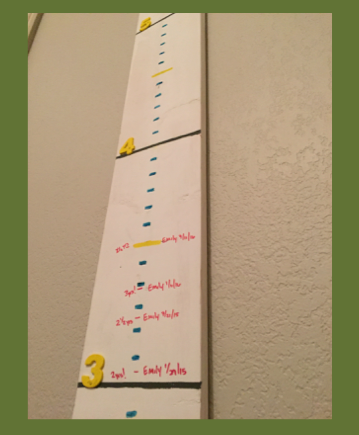
Now all you have to do is put it to use. With the permanent marker, make a dash indicating your child’s height at certain milestones throughout their life and indicate the date. For example, you could track your child’s height each year on their birthday and half-birthday. Make sure you include their height at birth as the first mark!
TIPS:
- Use a different color permanent marker for each child.
- When the kids are too little to stand up straight against the board for measuring, simply use the height information from their regular doctor visits to mark their height.
- This super, simple homemade growth chart makes a great baby shower gift for the parents-to-be! Personalize it with colors that coordinate with the couple’s home or the baby’s nursery.
At Five Star Painting®, we are always excited to share new, fun ways to use paint in and around your home. Paint is such a simple way of transforming the space you live in, from small projects like the one above, to full interior or exterior painting projects. We appreciate being part of creating spaces that make your house feel more like home!

